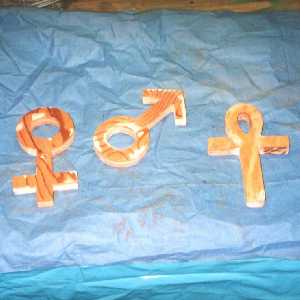
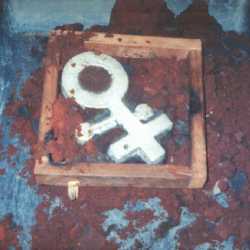
To make a nice casting you first need a nice pattern. From left to right in the photo are; the female symbol (I don't know the actual name for it); the male symbol (I don't know its name either!); and an ancient Egyptian ANKH (pronounced "onk") which represents eternal life. The patterns are a model of what you want a metal casting of. These patterns were cut from 3/4" plywood with various types of handsaws. Wood filling putty (I recommend Elmers® water based non-toxic wood filler) fills any chips or cracks and the pattern is filed then sanded smooth with sandpaper, and coated with polyurethane.
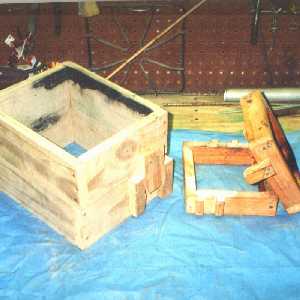
To make a mold the pattern is sandwiched within two layers of sand. After the pattern is removed from the sand a pattern-shaped cavity remains for molten metal to be poured into. First you need a frame to hold the sand in place. This frame is called a "FLASK." In the picture are two flasks. Flasks can be made to nearly any dimensions necessary. Note the interlocking "tabs" on the ends to keep the halves aligned. The top half is called the "COPE" and the bottom half is called the "DRAG."
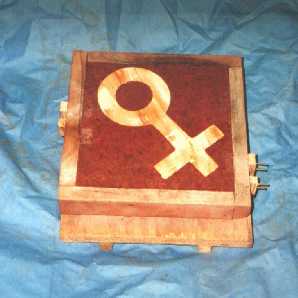
Since the patterns have at least one flat surface a technique called, well...I'll just call it flat-surface casting! is used to make the mold. A flat board called a "BOTTOM BOARD" is put down and the pattern is set on top of it. Then the DRAG is set UPSIDE-DOWN over the pattern.

Dump loose molding sand over the pattern into the upside-down drag and tamp it firmly into place with a special tamping tool (i.e. a piece of wood or something). The sand must be firm or the cavity will deform when the metal is poured in.Note: For this project I am using commercially made oil-bonded sand. Therefore it can be tamped harder and doesn't need venting. Homemade molding sand must be more porous and requires "venting" by is pushing a wire into the cavity and through the sand to allow a vent for steam to escape. Otherwise steam bubbles will completely ruin the casting.
After the sand is tamped in place and the surface is scraped flat, the drag is turned over (right-side-up) this is called a "ROLE" in foundry jargon. What do you know...the pattern is imbedded into the sand nice and flush with the surface.

Now it's time to dust the surface with parting compound. A handy dispenser is an old sock (or a new one for you high rollers out there) which you shake above the casting (avoid inhaling the dust). Without this stuff the top layer of sand will almost always stick to the bottom layer and you won't be able to separate the halves to remove the pattern. Notice the two "rails" on the bottom of the molding board slightly elevating it. These make it easier to lift and carry away the mold.
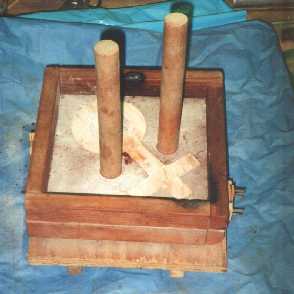
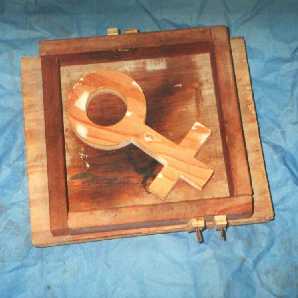
The molten metal is poured into the mold cavity through a hole called the "SPRUE." Another hole is sometimes added called the "RISER." To make the holes tap two dowels into the sand about 1 to 1-1/2" from the pattern. Here I used 1" dowels. Notice that the cope is also set in place.
Once again molding sand is tamped in. Make sure it is nice and firm, especially around the sprue and riser. There is no need to scrape the top surface flat.
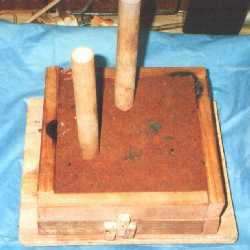
Carefully twist out the dowels and lift the cope straight up and off. A channel must be cut from the sprue and riser to the pattern cavity to allow molten metal in. This channel is called the "GATE." A properly bent piece of sheet metal makes a great gate cutter.
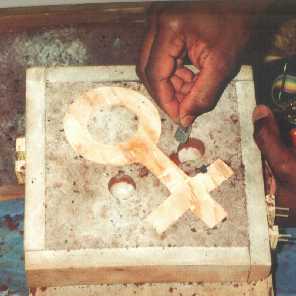
Now the pattern is removed. A close look at the pattern reveals a screw in it which was used to pull out or "draw" (in foundry terms) the pattern from the mold. Before pulling the pattern out you must tap it all over with a screwdriver handle or something. The vibration will loosen it from the sand slightly. Removing the pattern can be the most tedious and time-consuming part by far. A smooth, "slick" pattern might slip out easily while a rough pattern will probably scrape sand out the mold leaving a rough cavity. Sometimes steady hands, good eyes and patience will let you repair the mold. Other times it's best to just ditch the whole thing and start over (and I hate that). Notice the gates leading to the cavity. Carefully blow out any loose particles in the cavity and gently close the mold.
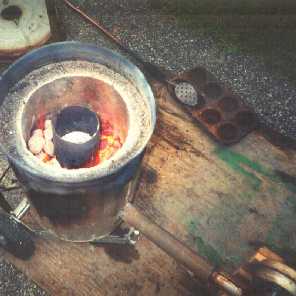
Now for the easy, no...SIMPLE part, melting and pouring the metal! Here's a picture of my homemade crucible furnace built from a medium sized non-galvanized steel garbage can, cement and a few other things. The fuel is regular bar-b-cue charcoal. Thanks to the little blower in the bottom right corner of the picture (taken out of a discarded dishwasher) the temperature can reach over 2000° F. The scrap aluminum is in my homemade steel ladle or "crucible" fabricated from a large pipe and screw-on cap.
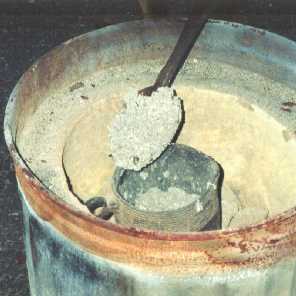
As the metal melts the dirt grime and other crud floats to the surface to be skimmed away with a large steel spoon. This crud is called "SLAG" or "DROSS" in foundry jargon.

After removing the slag only clean shiny molten aluminum remains. The metal melts at approximetely 1400° F. Now I can't speak for everyone, but I don't want my hand (nor any other part of my body for that matter) anywhere near that heat, so the skimming spoon is screwed to a length of pipe for safety.
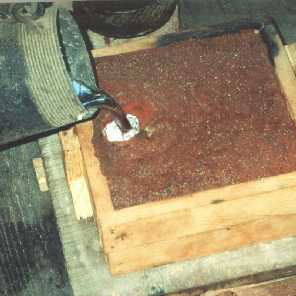
Once the metal is cleaned it's time for my favorite part, pouring it! Pour it as fast as it will enter the mold and don't stop pouring until the metal rises up into the riser (if there is one). If you look closely you'll notice that the top of the sprue hole is cut to a funnel shape. I used a spoon to do this.
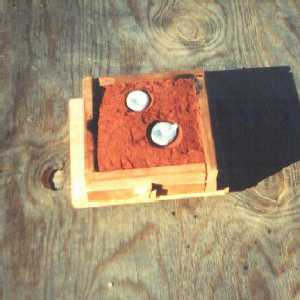
Here is a fully poured mold slowly cooling. Notice that it was filled until both the sprue and riser were full. As the metal cools it shrinks and draws extra metal from the sprue and riser. Give thick castings like these at least 30 to 45 minutes to cool a bit and completely solidify. For smaller castings 10 or 15 minutes is enough.
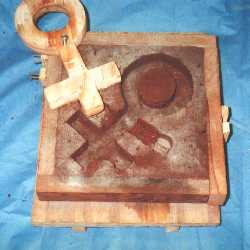
In this picture the mold halves are separated and you can see the casting still in the cope (top) half. Notice the ends of the sprue, riser and gates.
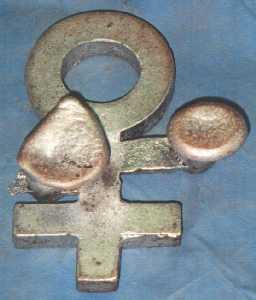
Here is a picture of the casting removed from the sand and the sprue, riser and gates still attached. A vice, good hacksaw, some files, a well honed chisel and a bit of sandpaper will remove the unwanted material.
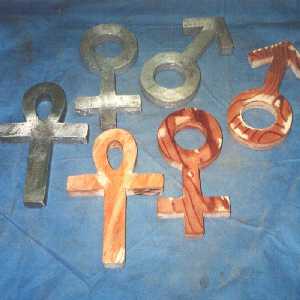
Here are the finished castings next to the patterns. I sprayed a coat of clear lacquer on them to keep the shine. I usually sand the castings just a little giving them a rustic "archeological dig" type of appearance instead of a machined, polished look. They are about 9 inches tall and weigh 1 pound (+ or - a couple ounces). Great paper weights!