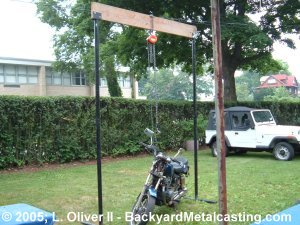
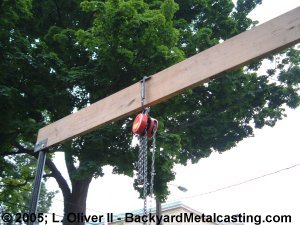
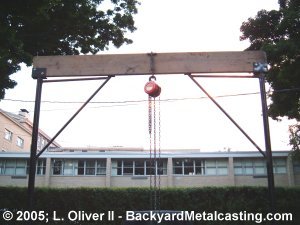
Here is the finished lifting gantry. It's nearly 11' tall and built from 2" steel pipes with a 2 X 10 top board. It's wide enough to drive a pickup truck through for loading. The chain hoist is rated at 1 ton (2000 pounds). At first I considered building this with an A-frame at each end but that'd have been over engineered for what I need. Plus I'd have had to buy more of this expensive pipe! This will be fine because gravity always pulls straight down, so the load will stay parallel to the side rails. This gantry won't fall over unless the load starts swinging like a kid on a swing set! And in that situation a falling gantry is the least of your worries! Theoretically the heavier the load the more stable the gantry will be! When not in use for lifting I can disassemble it for easy storage. The motorcycle in the photo was a project bike and it was easily lifted off the ground as a test.
Before the first test I didn't know what to expect. I know I wanted it to lift the motorcycle with ease but I built this gantry in one day, have no experience with one, and am using a cheap imported chain hoist. Aside from that the base "feet" are only 3' long each and I was thinking that maybe I should have stuck with my original design for them of 5' long each.
At any rate I grabbed some clothes line rope to wrap around the frame of the bike and attached to the chain. I got lazy and wanted to hurry up with the test so I only wrapped the rope on the frame twice. Hoping for the best I began pulling the pull chain. The chain gears began turning and the lifting chain began to tighten. Suddenly the suspension on the bike seemed to relax. Next thing I know the bike is floating off the ground about two inches! I didn't even feel an increase in resistance on the pull chain!
This homemade contraption lifted the bike so effortlessly that I was almost dumbfounded! It felt almost effortless operating the hoist. And there was no swaying nor creaking nor groaning nor any other bad noises from the gantry! It worked absolutely as well as I was hoping! Things almost never go this well for me! However a few seconds later the clothes line rope I used as a harness broke and the bike dropped back to the ground. I'll buy an actual lifting or towing strap.
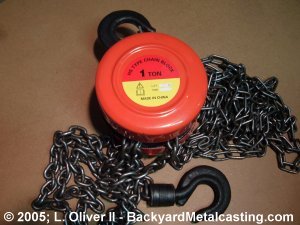
Here is the 1 ton rated chain hoist. Ok so I bought a cheap one on Ebay for $19.00 but hey I have a small budget and don't intend to use this for more than about 1/2 it's rated capacity. It actually seems well built, but then again I've never examined a brand name one for comparison.
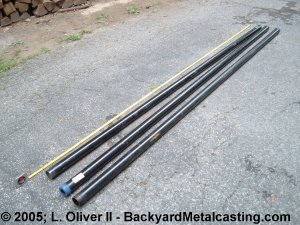
Here are the pipes that the framework is built from. Like I said it's 2" steel water pipe. These are 10' lengths bought from the Home Depot.
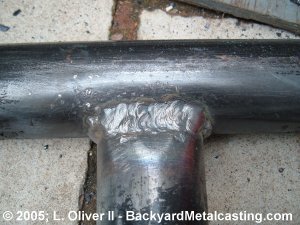
After I cut the threads off the ends I had to prepare the pipes for welding. I decided to partially flatten the ends so they'd contact the adjoining pipe more completely. Another (and probably superior, but more labor intensive) method is to notch the end of the pipes so they straddle the adjoining pipe neatly. I've also sanded the paint off the areas to be welded to get a cleaner weld. This photo is a finished weld. This was the last of about three weld passes and was done moving the electrode in a weaving pattern to get the wide coverage.
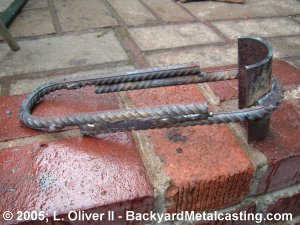
This thing that almost looks like a big paper clip is what the actual chain hoist hangs from. I just welded together the outsides of two U-shaped pieces of rebar. On the right end is a "saddle" made from half of a piece of pipe to straddle the top board.
I call this piece the "harness shackle." The loop on the top goes over the lifting hook on the chain hoist and the harness material (either rope or towing strap) passes through the pipe. This is just a way to attach the harness to the chain without damage.
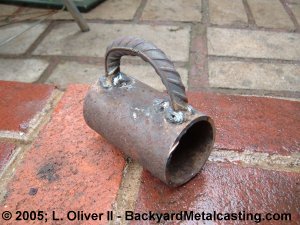
This is a 5,000 pound capacity vehicle towing strap. It probably can't lift 5,000 pounds, but it's for towing a vehicle up to 5,000 pounds. After the rope broke when lifting the motorcycle I decided that I'd better buy something stronger. This strap is 15' long and was $19.00 from Auto Zone. With this strap I didn't even need the harness shackle. I just hooked the strap's hooks to the chain hoist's lifting hook.
Here is the chain hoist (a.k.a. chain block) hanging from the saddle/giant paper clip looking thing. And the saddle is securely hanging from the cross board. The cross board is bolted into a very large piece of angle steel assembly welded to the top of each side rail. It just so happens that this cross board is an OSHA approved scaffold plank given by some construction guys after finishing a job. Construction companies often give away the leftover materials after a job rather than spend the time and money taking them away! I was going to use two boards screwed together but I figured if the load is heavy enough to snap or crack this 2 X 10 board it's too heavy for the small pickup truck I have access to! I consider that a built in safety feature!
I decided to add these corner brackets to provide some extra support for the top board. These brackets reinforce the cross board so the weight is mainly just on the center 3 feet of the board making it less likely to fail. These were actually installed after I saw the machine for the first time. The first trip was to disassemble the machine and take away the smaller parts. The second trip was to get the main part of the machine. After I saw that the machine is twice as large as I thought I decided to add these brackets. Even though I was confident the pickup truck could carry the 900 pound machine body I started doubting the board's strength across such a span. I couldn't stop visualizing the board snapping cataclysmically during the lift. Better safe than sorry.
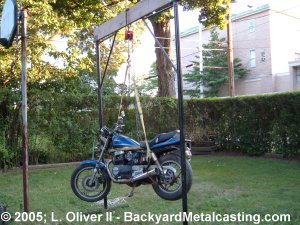
Here is a photo of the motorcycle in the air. This photo is just for fun since it was taken 4 days after I lifted the milling machine that I actually built this gantry for. Now I can disassemble it and wait until I have a new machine to load or unload. Or an engine to lift out a car or truck, or a pallet load of some heavy stuff to put on a pickup truck or... you get the idea. Now that I have experience, I've been designing an extra heavy duty gantry with a 3 or 5 ton chain hoist, A-frame side supports, and steel crossbar. But I won't build it unless I ever need it. But what in the world would I ever need it for?? I guess I just like designing mechanical things.