| Some of George Vontorne's propane tank muller photos | ||
 |
 |
 |
 |
 |
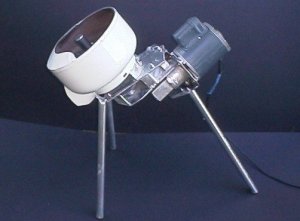 |
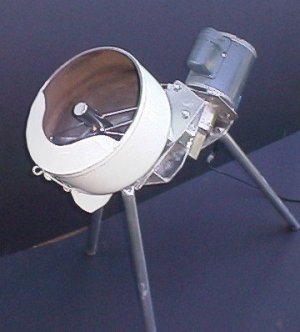
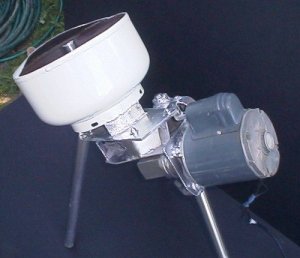
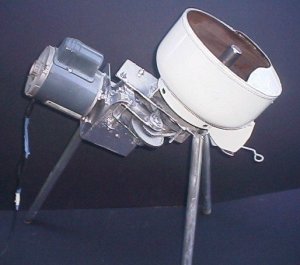
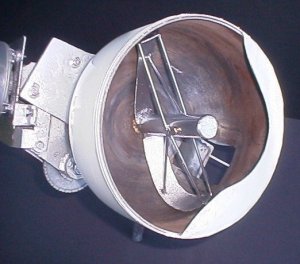
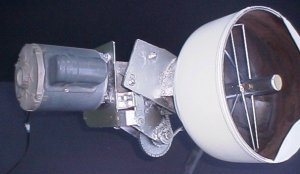
A sand muller is a machine that mixes and restores the "ready-to-use" texture of molding sand. George sent me these plans for a sand muller which he designed and built so that other hobby metalcasters can benefit from this machine. If you've been wanting to build a muller but couldn't obtain a suitable drum like some of the big mullers shown online, or just need a small unit for your light hobby work, this may be just the ticket! Questions concerning this project should be sent to George. The plans were sent to me in PDF format but I converted them to regular web page format for easier access.
| Some of George Vontorne's propane tank muller photos | ||
|
|
|
|
|
|
How to build a sand muller
Caution.
In the interest of personal safety it is recommended that you use a brand NEW tank that has NEVER held any gas, or if using and old tank, make sure it is thoroughly empty of all traces of LP or propane gas. The cutting of LP/propane gas tanks has the same, or greater danger than cutting or welding old petrol tanks. You could be dealing with a potential bomb. If you have to use an old tank, make sure you fill the tank 3/4 full of water before using an Oxy-acet. cutting torch, or when cutting with a metal cut off disk on an angle grinder. Water will reduce the amount of air space in the tank; hence lessen chance of a blow up.
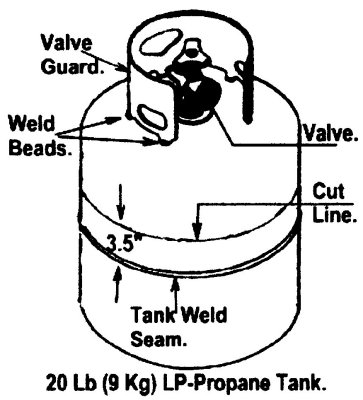
Step one. If you are using an old tank make sure the valve is closed, and ensure that you don't grind through the tank casing. Do not use an Oxy-cutting torch on an old tank at this point. With the guard removed you need to saw off the valve with a hacksaw. If you are dealing with an old tank, do not use a grinder or torch to remove the valve. Of course if the tank is new you can cut the valve body and boss off quite safely with a 9" angle grinder. Once the guard is removed you may be able to unscrew and remove the tank valve. Lay the tank on its side. Using a text marker draw a line around it 2.5" - 3.5" above the center weld seam of the tank. (See illustration above). If you are using an old tank that has previously held gas then you will need to wash it out with soap and water. Fill the tank and slosh it around for a minute then empty the contents out.
Do not start cutting the tank until you have studied all of the drawings and read the instructions from start to finish. |
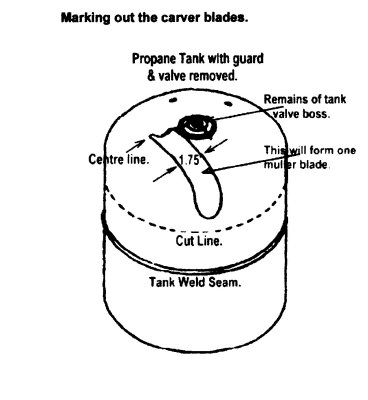
Take your marker pen and draw a line radiating out from the center of the old valve boss. next start nearest to the boss and using a straight edge or ruler draw a line at right angle (90 Deg.) to the center line. Continue to draw along the top of the tank and down over the curved side of the tank to the cut line marked around the tank. This curved piece will form the trailing edge of your blade. Draw carefully to keep the line straight, looking at it from the top. Now as you can see in the diagram you need to measure out from the first line about 1.5" to 1.75" (the wider measurement will probably be best). Then draw another line down over the edge parallel to the trailing edge. This will be the leading edge. Connect the two lines with a curved line as in the illustration by either hand drawing or by using a circle shaped template. Do not cross the cut line that you previously marked around the tank. Rotate the tank 90 deg. And repeat the steps above on the other side (see the next illustration). You should now have both blades drawn. Do Not Cut The Cylinder Yet. As you may have noticed from the drawings the top of the cylinder is used to cut most of the parts for the muller. The top of the cylinder will be cut off and discarded. Please be careful as you mark out all the items before you begin to do any cutting. Tools For Cutting |
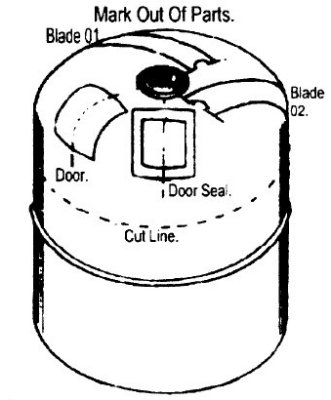
Now the fun begins Now you need to draw the dump door and the door seal. To do this draw a line out from the valve boss like you did to start the blade drawing. This will be the center line of the door. Move to the side of this line 1.75" and draw a line over the curved area seen in the illustration. Move to the other side of the center line and repeat. These three lines are to be parallel. Measure out 3" from the center of the valve hole, make a mark and go another 4.5" and make another mark. Draw a line perpendicular to the center line and connect the two side lines at the marks; you should now see a drawing of the door. Move to a new area and draw a new center line for the door seal. Measure out 2.75" from the valve hole center and make a mark. Measure 7.5" from the center of the hole and make another mark. To the side of the center line move over 2" and draw a line parallel to the center line. Repeat this on the other side of center line. Draw lines perpendicular to the center line and you see a square shape larger than the door. Now inside of this door seal square, draw a smaller square (see illustration) sides should be about 1/2" wide. Now you have all the drawings done. You can now cut the tank in two halves along the cut line that you marked out earlier. Cut out the blades and the door parts. When you have the door cut out place it on the bottom part of the tank. The part corresponding to where you cut out on the top. Draw around it, cut this area out, but stay inside the lines. You want the door to fit closely with a slight gap of no more than 1/16". Plans are continued on the next page; part 2 |