
Image on left: This view is from the bottom of the tank which shows the floor stand ring on the base of the tank, part of which has been cut away to allow room for the location of the dump door. The sketch shows the door opening already cut out.
Note: There are two parts that make up the dump door. The inner or smaller part of the door is the cutout. When the door seal is overlaid and welded to the inner section it will fill the void left when you make the cut-out in the bottom of the tank (see picture). For efficient mulling action the inside surface of the tank must remain smooth. The filler piece will ensure smoothness. Tack weld seal and inner door piece on the outside only otherwise the door may not seal correctly.
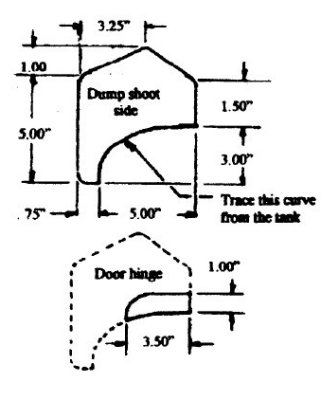
Image on right: These are the parts for the dump door hinges. The curve where they meet the tank can be traced by inserting a cardboard pattern or template in the slot made from cutting out the blades. Trace the hinges using the dump shoot side as a pattern, see illustration. The plate thickness of the material for the parts are .125" or 1/8" ms plate.
When the trap door on the bottom of the muller is opened it will form the third side of the shoot to direct the mulled sand into a bucket or container.
The door is to be centered in the door seal piece so the door will fill the hole cut for it which makes the inside smooth. If you have been careful when marking out and cutting the parts outlined on page one these parts should all line up accurately ready to weld. The seal will lay over the gap on the outside of the tank. Weld the shoot sides on the tank leaving about 1/16" between the seal and the shoot side.
After you have welded the shoot sides in place you can weld the hinge pieces to the door. Leave a gap between the chute sides and the hinges of 1/16". An easy way to get the door to align correctly is to pre-drill the hort hinge flats before welding on the sides of the shoot (it can be done with careful setup and marking out). Then the parts can be assembled and placed on the tank and tack welded. Then you can check the operation of everything before doing the final welding.
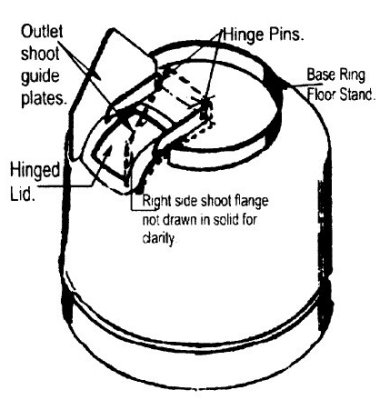
The view shows the tank with the door assembled with the door seal and hinges welded in place. Only one side of the shoot is shown as a solid. The other is left out for clarity. Note the hinge pin line. Some people may with to drill the holes after the shoot sides are welded to the tank and the door is in position.
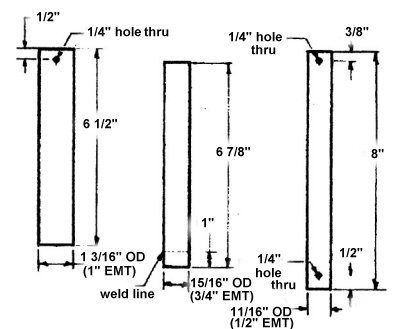
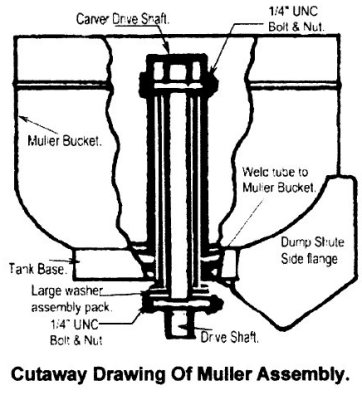
Now, a 1" diameter hole will need to be drilled or bored dead center in the middle of the tank bottom to install the center stand tube. Insert the tube up to the weld line shown in the illustration and weld it in place. Make sure that it's straight because it forms the axle for your carver blades.
The various tube parts shown above can be made from electrician's metal tubing which can be bought from Lowes, The Home Depot or your local electrical contractor. A good metal supply shop should also stock a heavier guage ERW tubing if you wish to use this. Contact your local electrical man first as he may have some short ends left over from a job that he will give you. You will use one complete length of 1" tube if you use it for the support legs of your muller.
Notes:
When building projects such as the muller, a lathe will allow you to machine many of the parts for greater accuracy rather than relying on hand finishing with a file or hand held grinder. In fact when you come to a point of building and fabricating the reduction gear drive a lathe will come in handy for machining the shafts, bosses, collars and any other parts that may require machining.
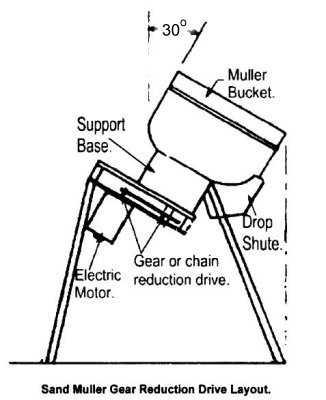
Because there are different ways to build a gear reduction unit, eg chain and sprocket or gearbox, we are only showing you the setup angle of the muller. This is the optimum angle to tumble and mull the sand.
The carver blades should rotate between 25-35 RPM. So whatever reduction method you use you will have to do the math to figure your reduction to these speeds. With a 1750 RPM motor the reduction will be about 60:1. Electric motors in other countries may operate at 1350 RPM so a different reduction gear set will be required.
This mulling machine has three support legs; two at the front and one at the rear. Make sure the legs extend forward to the front of the bucket and calculate the length to make the legs long enough so you can dump the mulled sand into a 5 gallon pale or a normal domestic garbage bin. Give the legs plenty of spread to make sure the muller is stable while operating.
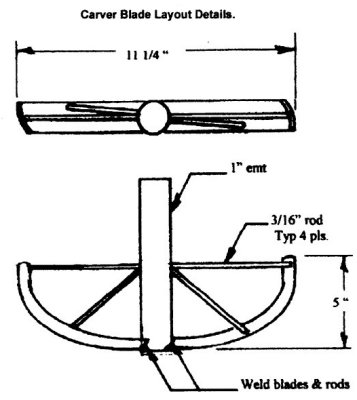
The blades should be about 1/4" above the bottom of the tank when the carver is installed. If not you make the required adjustments as needed. There could be quite a bit of trial and error of fitting involved before you arrive at the optimum 1/4" clearance between the blades and the bottom of the muller bucket.
Notes:
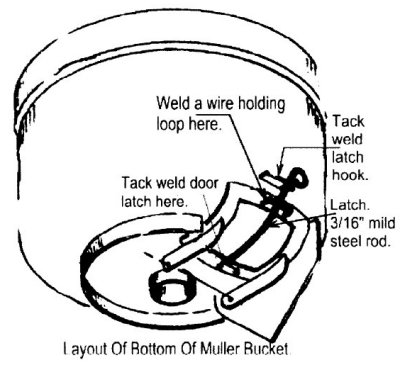
The wire latch
Fashion the latch from a short piece of 3/16" mild steel rod or even a piece of welding rod. It is designed to be spring loaded so that it snaps into the latch hook.
The latch hook
Make this from a small piece of flat plate. Cut a small section from one side to form a groove for the wire to locate in between the tank wall and the latch. File a small "V: or circle radius to help locate the wire when it is closed.
The wire holding loop
This item can be made from the same material as the latch wire.
Return to part 1.