| Part 1: Bases and bed |
Go to part; 1 -- 2 -- 3 -- 4 -- 5 -- 6 -- 7 -- 8 |
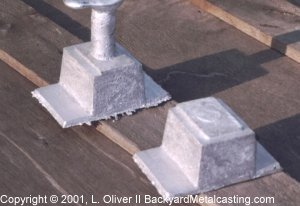 |
Here are the bases freshly cast. You can see the sprue left on one. When the sprue is directly on the casting like this its called a "pop gate." Notice the ridge on the top of the castings. This is so the bed will interlock with it. |
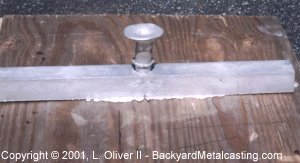 |
Here is a pic of the bed casting. It weighs about 4 pounds. |
Dave Gingery recommends building the pattern from 1/4" plywood. All of the 1/4" plywood I've seen were about as warped and bent as an archer's bow. The 3/8" plywood wasn't much better. So to get a straight pattern I took some wood wall paneling material, sanded the smooth surface to rough it up then smeared a generous amount of glue on them. I set two pieces together on a steel table saw table and put a straight, weighted board on it (I used about 30 pounds of weight). The glue impregnated the wood softening it and the weight caused it to dry perfectly straight. The resulting stock was just under 3/8" thick so the pattern is very robust and solid. |
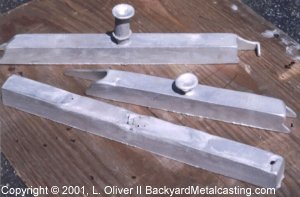 |
These are some of the bed castings that didn't come out. The problem was that I was using my 4" crucible in the flowerpot furnace and the crucible is actually too big for it so the metal never got hot enough to fill the mold. The solution was to melt just enough metal to fill the mold and no more (previously I was melting enough extra metal to pour some ingots also) and thankfully that worked. |
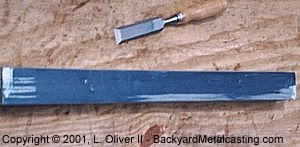 |
Here is the bed casting smeared with Prussian blue oil paint purchased from an art supply store for about $3.00. I did the scraping with a cheap dollar store chisel. I don't know if I mastered scraping but I sure got a lot of practice sharpening that cheap chisel... |
 |
Here is the bed scraped and ready for the ways. The holes are drilled and tapped for the bolts and lugs that attached the bed. This stage was finally reached after about 6 or 8 hours worth of scraping. It might not take you that long but my bed was a bit "cratered" because of overzealous venting with the vent wire. I actually used a wood plane to bring the surface down to an initial shiny flat surface. To part 2; carriage assembly. |
| Part 1: Bases and bed |
Go to part; 1 -- 2 -- 3 -- 4 -- 5 -- 6 -- 7 -- 8 |