| Part 3: Leadscrew assembly |
Go to part; 1 -- 2 -- 3 -- 4 -- 5 -- 6 -- 7 -- 8 |
 |
The first thing I did was install the apron. It's the rectangular casting. |
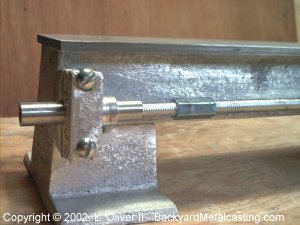 |
This is the left (headstock) end of the leadscrew. You can see the bearing of course, with the journal in it. The leadscrew (threaded rod) is threaded into half of the journal and one of my homemade setscrew collars is keeping it in place. |
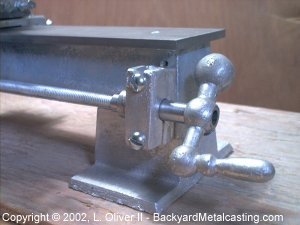 |
Here is the right (tailstock) end of the leadscrew. It's the same setup as the other end except there's no rod coupling nut and a ball handle is attached for hand feed. Dave Gingery says to thread nuts onto the leadscrew against the journals to act as lock nuts. I didn't do that because I didn't fully understand the drawing at first and I found that threading the journals on very tightly makes the locknuts unnecessary (at least as far as I can tell right now). |
 |
For some reason Dave Gingery is big on using auto body putty as if it were wood filler. And he also directs the reader into using it to print lead screw threads onto the splitnut pattern. I actually use non-toxic water based wood filler to fill the wood flaws and make fillets so I wasn't about to buy a $16.00 can of auto body putty for such a small part.
|
Instead I got some plumber's putty called "propoxy 20" (made by; Hercules chemical co. inc.) available in the plumbing section of your local hardware or plumbing supply store near either the solder and Teflon tape or the adhesives. Another type is called "epoxy putty" (from; Oatey) They seem to both be the same. There are also other brands simply called "plumber's putty" and the colors just vary slightly. The putty comes in a cylindrical tube with a white core and grey outer layer (some brands have the colors reversed). You break of some of both colors and knead it between your finger until it's uniformly grey. About 20 minutes later it's "steel hard" (according to the package. It's hard as heck but not hard as steel). I put some putty on the splitnut halves and squeezed them onto the leadscrew as described in the book and the threads were printed with the pattern ready to be removed in 5 seconds! However I left the pattern on the leadscrew for 5 minutes before removing it. I don't even think the silicone spray was needed. I couldn't resist testing the accuracy of the threads so I attached this pattern to the apron and it actually drove the carriage on the leadscrew! But don't try it unless you're willing to risk breaking the pattern. |
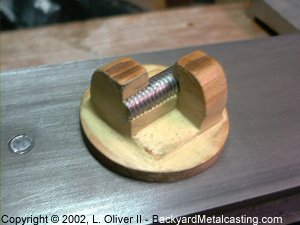 |
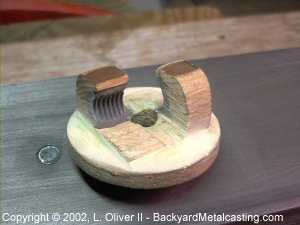
Here is the finished splitnut pattern with steel core (to leave threads in the sand for the piece of threaded rod that is set in the mold) in place and the fillets all done and smooth. Make the fillets as small as possible because they need to be cut, chiseled and all out filed away to get the threaded core out the casting. |
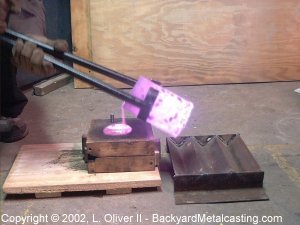 |
Here I am pouring the splitnut casting in my baby flask. This is metal from another run in part 3 of the "2 bucks" furnace adventure. |
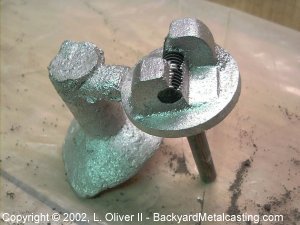 |
Here's the splitnut as it looked fresh out the sand after a little filing. I got my pot metal to cast this part from the casings of some vacuum cleaner motors I dismantled. I threw a few aluminum lawn chair tubes in the pot also. Now I need to cut the fillets away, remove the core and cleanup the resulting threads with a tap. |
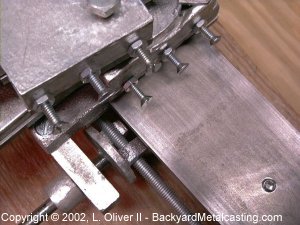 |
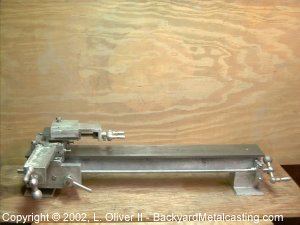
Here's a peak over the apron where you can see the splitnut casting engaged on the leadscrew. |
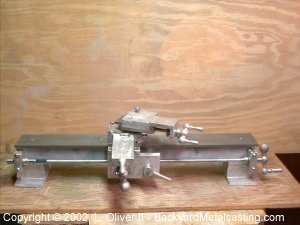 |
Here's a look at the lathe so far. It's really starting to look like a lathe! You can also see the splitnut detent lever on the face of the apron. Its used to engage and disengage the splitnut with the lead screw. |
 |
Here I cranked the carriage all the way across the ways and back. The lead screw assembly works well! Click here to get a sneak peak at a picture from next update the countershaft! |
| Part 3: Leadscrew assembly |
Go to part; 1--2 -- 3 -- 4 -- 5 -- 6 -- 7 -- 8 |